Smart Home Thermostat
After moving houses and no longer having a Nest Thermostat, I wanted to try my hand at creating an equivalent product. There are still many features I am working on adding, but the current version has been operating reliably for several months.
Quick Specs
- Furnace Type: Two-wire Systems
- Microprocessor: ESP8266
- Network Protocol: MQTT/HTTP
- Dashboard: smarttherm.dylanrae.ca
- App Compatibility: (Android & iOS coming soon)
- Code Repository:
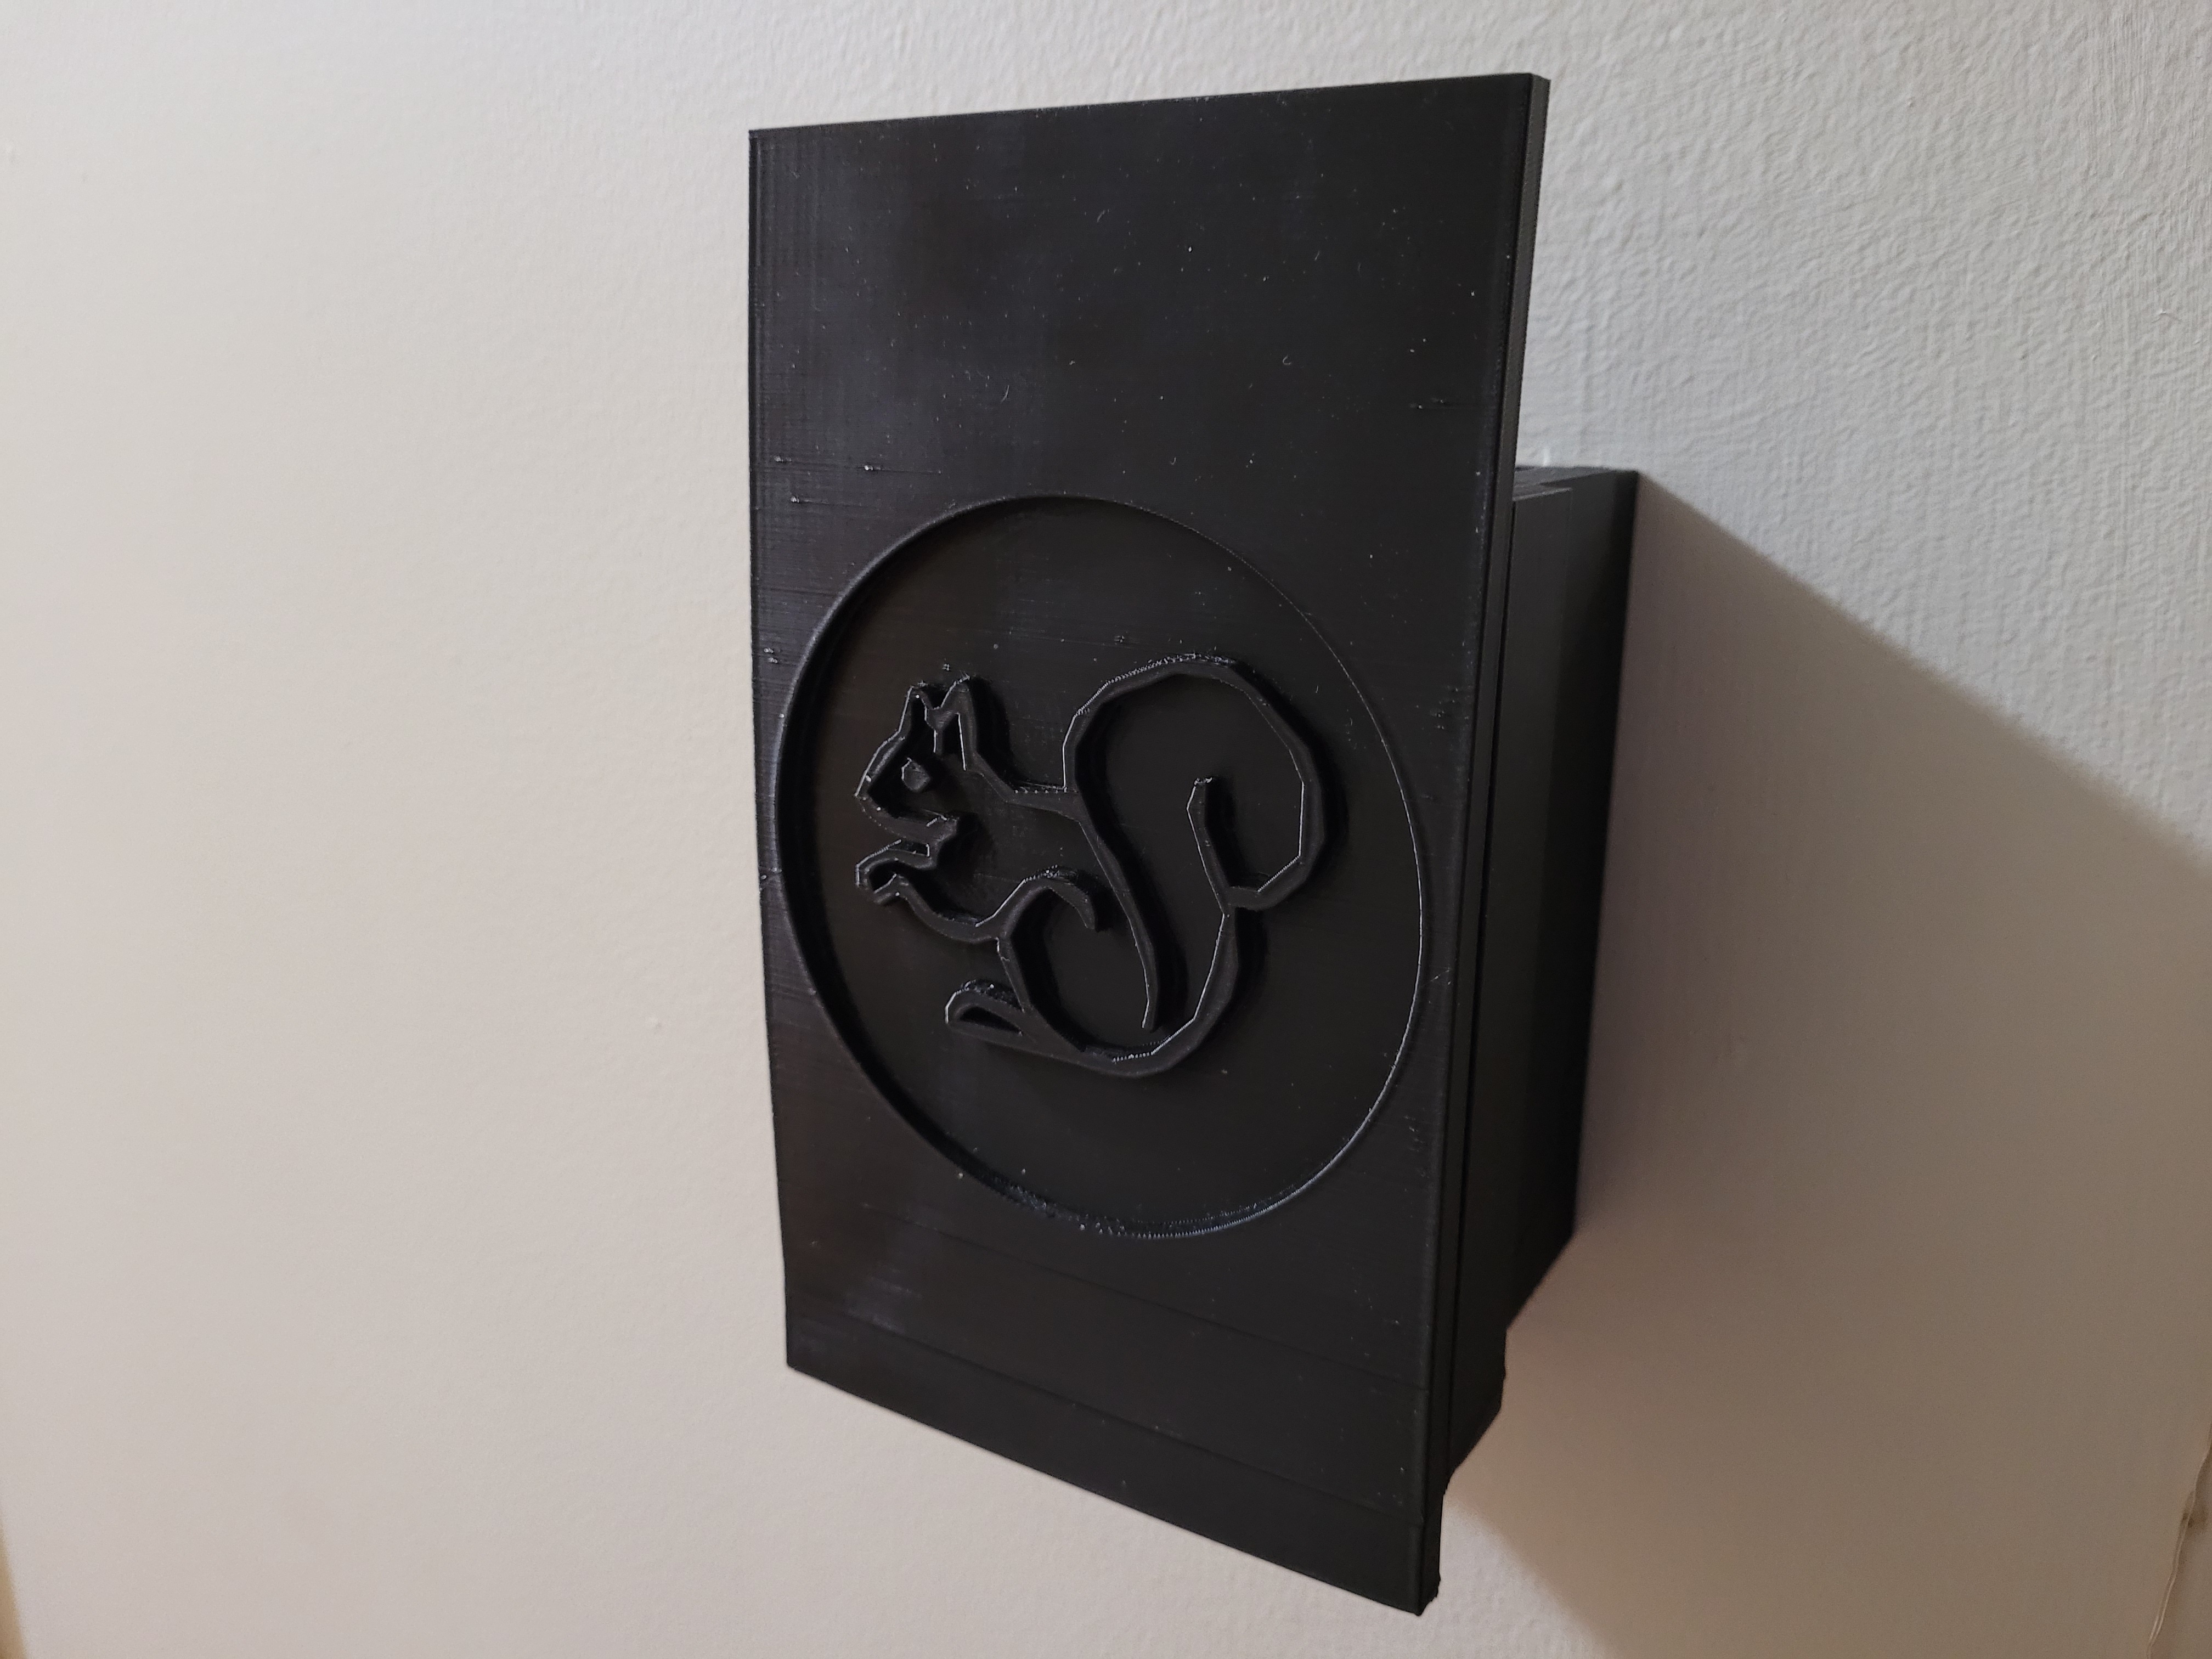
Enclosure
The above model is the front plate of the enclosure. The front panel is curved for aesthetics and features an engraved graphic. Behind the front panel is a slot that holds a standard 8,000-10,000mAh battery pack. The side rails have grooves that allow the enclosure to slide over the furnace wires and into a resting position on the back plate.
This piece of the enclosure screws onto the wall. It was designed to use the screw holes of the old thermostat and to use a minimal amount of material to reduce cost and printing time. It features a widened screw slot for the bottom screw, which allows the plate to be leveled before the lower screw is locked into position.
Updates and Progress
Progress on the smart thermostat has slowed as other projects have required my time. Since my last update I have transferred the back-end for the
thermostat to a new raspberry pi with a bit more power. I took this opportunity to familiarize myself with Docker. I started by learning how to run
the Mosquitto MQTT broker and MySQL server within containers. I did some simple testing and was confident they were working as expected. I then
learnt about a web-based application for managing Docker called portainer.io.
This made it much easier for me to visualize my containers and images as well as troubleshoot problems.
After getting applications with prebuilt images working, I then moved on to writing a custom Dockerfile for running my Flask backend within an Apache
server. Here are the general steps that the Dockerfile follows to build the application:
- 1. Start with a fresh install of Debian buster for the OS
- 2. Install apache2, apache2 wsgi python 3 package, and python 3.7
- 3. Set python3 as default python, then copy the .txt file with the python library requirements. Pip install these requirements.
Load in the apache2 .conf file and enable the .conf along with headers and ss
- 4. Download src files as well as https certificates
- 5. Finish by linking apache config to docker logs, exposing required ports, and starting the application in the foreground
This took some troubleshooting to get working but is now reliable and easy to make changes too. If I ever want to transfer the back end to a new computer, the process should be much easier with Dockerfiles ready to be built. Next step is setting up a Jenkins pipeline for automation and faster development!
I made progress in a couple areas:
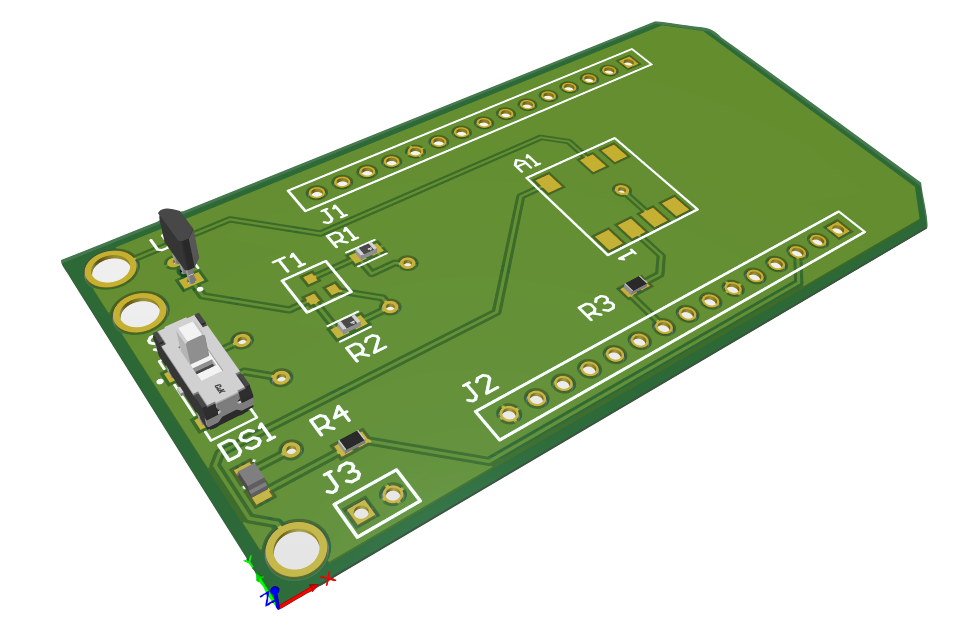
- 1. Finished PCB v1: Due to delays receiving parts and problems getting access to a soldering workbench, finishing v1 of the PCB's
took longer than expected. They have been fully tested and work as expected, however one major problem was found. The temperature sensor is easily
influenced by changes in temperature to the PCB substrate because it is not sufficiently thermally isolated. v2 of the PCB will incorporate changes
to resolve this issue, but in the meantime I am going to experiment with some options to see what works best. Pictures of the finished product coming
soon!
- 2. Back-end support for multiple devices: I started by redesigning the database to include new tables for "Homes" and "devices".
Each user is assigned a home, and each home records a list of devices in that home. This way, when a user logs into their page, they are shown only
the data that is obtained from their home. Currently the device types supported are thermostats (temperature logger and temperature controller) as
well as temperature loggers (for recording temperature at different spots in the home). As part of this update, I also updated several API endpoints
to accommodate these changes to the database and still work as expected. Next I need to do some front-end work to seamlessly display a "house" view with
all devices registered.
I made a couple more improvements to the thermostats website:
- 1. Navbar Improvements: All navigation links now work and take you to template pages in some cases. I will be working on the front
end to add content to all of these pages shortly. I also added some simple Javascript to highlight the current page on the navigation bar. Finally,
I adjusted some formatting on the pages made titles and collapsed navbar icons such that they are formatted correctly even on the smallest of mobile
screens.
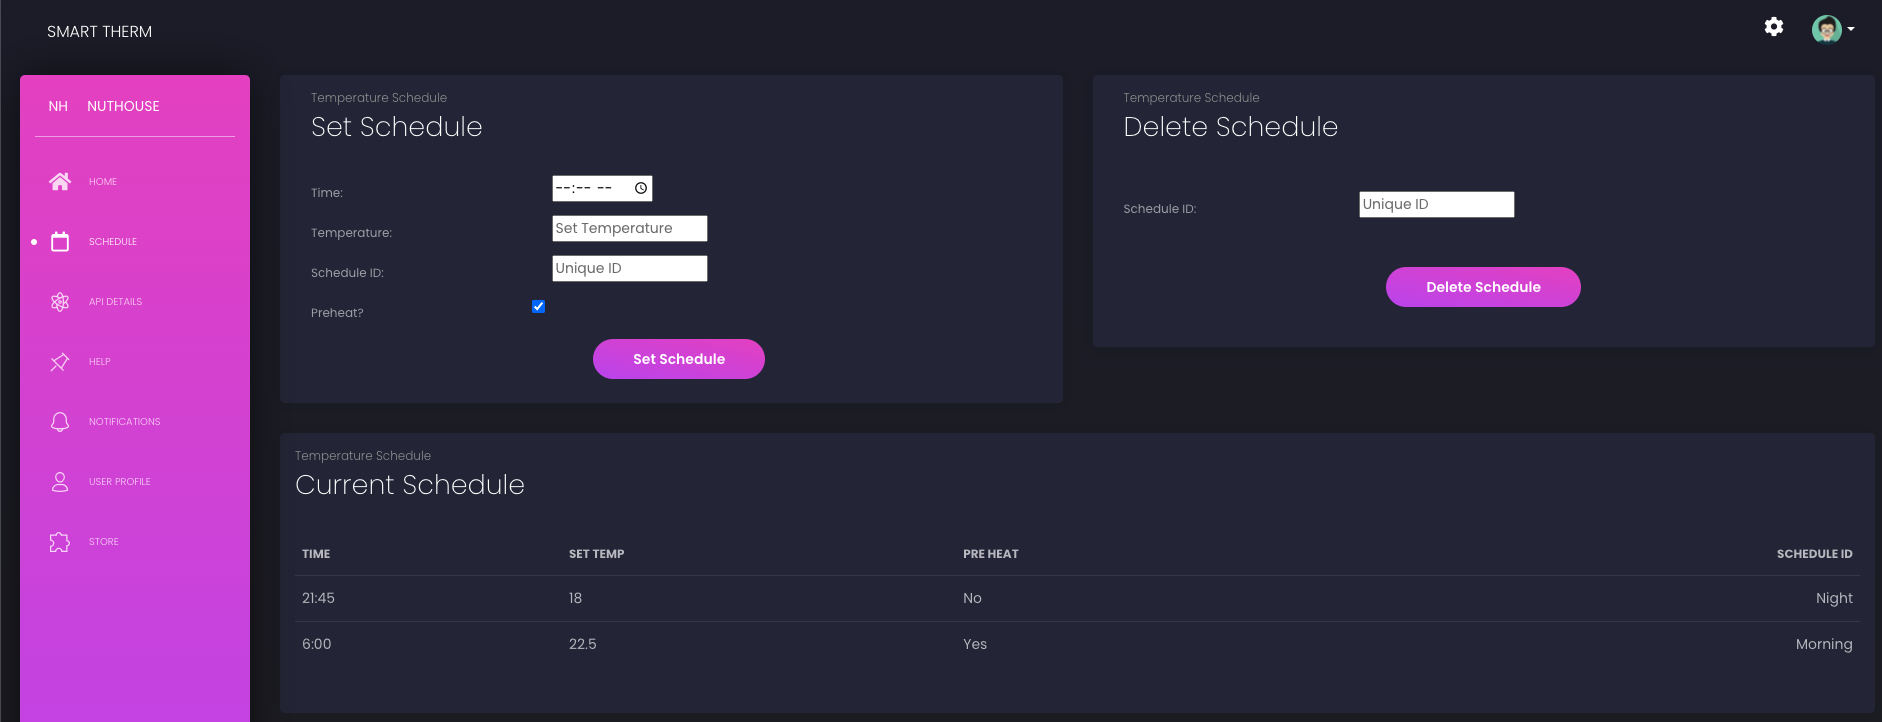
- 2. Schedule Page Formatting: I started with a sketch of how I wanted the page to look and started to put my vision to work beginning
with the forms. Finding spacing for the forms that looked good on both wide monitors and small mobile devices was challenging but I am happy with the
result. I then worked on the spacing and layout of the rest of the page and the result is an easy to use and attractive UI that adjust well to all types
of devices.
After finishing the content on the rest of the pages, I may start to dedicate my time to other projects until there is sufficient heating data to start playing around with some machine learning models to predict heating times and reduce total energy usage.
I have added three major features to the thermostats website:
- 1. HTTPS Support: I finally have proper https support working for the website. The main tasks required to make this work were opening port 443
on my router, configuring Apache with the correct certificates and keys, and redirecting http traffic on port 80 to port 443 for https. Configuring Apache
with the correct keys was quite difficult for me, and I learned that browsers have many safeguards in place to ensure a https connection is safe and
secure. I had to ensure the origin of my key and certificates matched information provided by my DNS provider and was able to do this by generated
certificates from their website.
- 2. Temperature Setting History: This data was originally going to be displayed with a graph, but I later decided I could better provide
that data as a table view, and I would get extra practice working with tables in html. I added a new end-point to the back-end for retrieving set temperature
records between a specified date and time range. From here, they are sent to the browser upon receipt of an ajax request. The browser then runs javascript that
reads the result and inserts it into the pre-made table. For viewing. The table is dynamic so spacing will adjust and scroll bars will automatically appear when needed.
- 3. Login Functionality: As this is a public facing website that is open to the internet, I wanted to start protecting certain features available in
the site. Implementing a proper and safe login feature required extensive development on both the back and front-end. In the back-end, I used flask
extensions and libraries such as flask_login, flask_sqlalchemy, flask_wtf, werkzeug.security, and wtforms. User's account data is stored in the MySQL
database and is managed in the Flask code with SQLAlchemy. To protect user's passwords, I hash the passwords with a SHA256 algorithm before storing them
to the MySQL database. When they submit a username and password for logging in, I use the werkzeug.security library to compare the hash's and verify a
user's login credentials. From here I use flask_login to log the user in to keep track of their sessions. The login form has a remember me function so
that user's do not have to log in repeatedly. Now that a user is logged in and I can keep track of their session, I customize the html templates before
sending back to the browser for a customized user-experience. In addition, I am able to protect the functionality of the set temperature form unless the
user is logged in. If the user is not logged in and they try to set the temperature, they will instead be prompted to log in. A current security hole is
that the login form could be spammed and submitted repeatably, and in the future I will address this risk.
In addition to these features, I have been doing lots of reading about cloud deployment to a service such as AWS. The steps required look totally doable, and
there would be some clear benefits to moving off the Raspberry Pi and into the cloud. At this time however, I am still early in development and will revisit cloud
deployment in the future. My next big sprint will be introducing scheduling capabilities. This feature will have exciting opportunities for machine learning applications
to best predict the preheating start time. I am also planning on deleting unused css code and reorganizing the Flask code.
I have added a second chart that allows the user to display the last day, week, or month of temperature data. Creating this graph was much
harder than I initially expected, and the challenges arose from the asynchronous and unpredictable nature of ajax calls. Because ajax calls
are asynchronous, it is poor practice to count on the data being returned. Instead you should only call functions from within an ajax call.
The below photo is a flow chart showing the progression and stages of an ajax call:
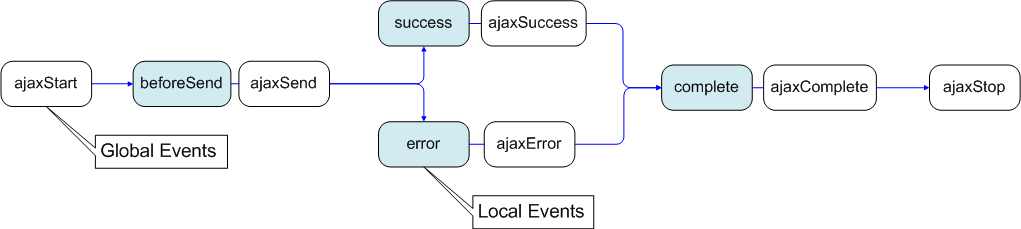
My solution was to use one function that uses 3 nested ajax calls to retrieve all three data sets necessary for the graph. After the
first call is complete the graph is constructed with the default data. I then use simple javascript to toggle between the 3 graph views once all the ajax
calls have returned their data sets. I had to ensure I was careful that the right code was executed at the right time by placing the code in the right stage of the ajax call.
Some fo the final features I want to finish before I move onto a new project are temperature scheduling with preheating, https functionality, a login to
protect the set temperature function, and a simple page for API details.
I first added a new endpoint to the API that can be used to retrieve historical temperature data. The endpoint works by providing the
start and end date/times you would like data for. Then by specifying the number of data points the Flask back-end averages the temperature
samples down to the number of points requested. I managed the data using the pandas python library.
The front end uses AJAX requests to retrieve the data and display it on the graphs. I use the javascript library day.js to work with the
date times. Currently only the first 12 hour historical graph is working, but now that I have one working the rest should be completed
rapidly. I need to spend some time cleaning up the code as well a fixing some small formatting issues I have noticed now that I am using the
site more. Looking forward to seeing the trends on the graphs and making even more progress!
I resolved the issues I was having with MQTT and was able to keep the MQTT client integrated with the Flask app. For now, the queries
to the MySQL database are now working flawlessly.
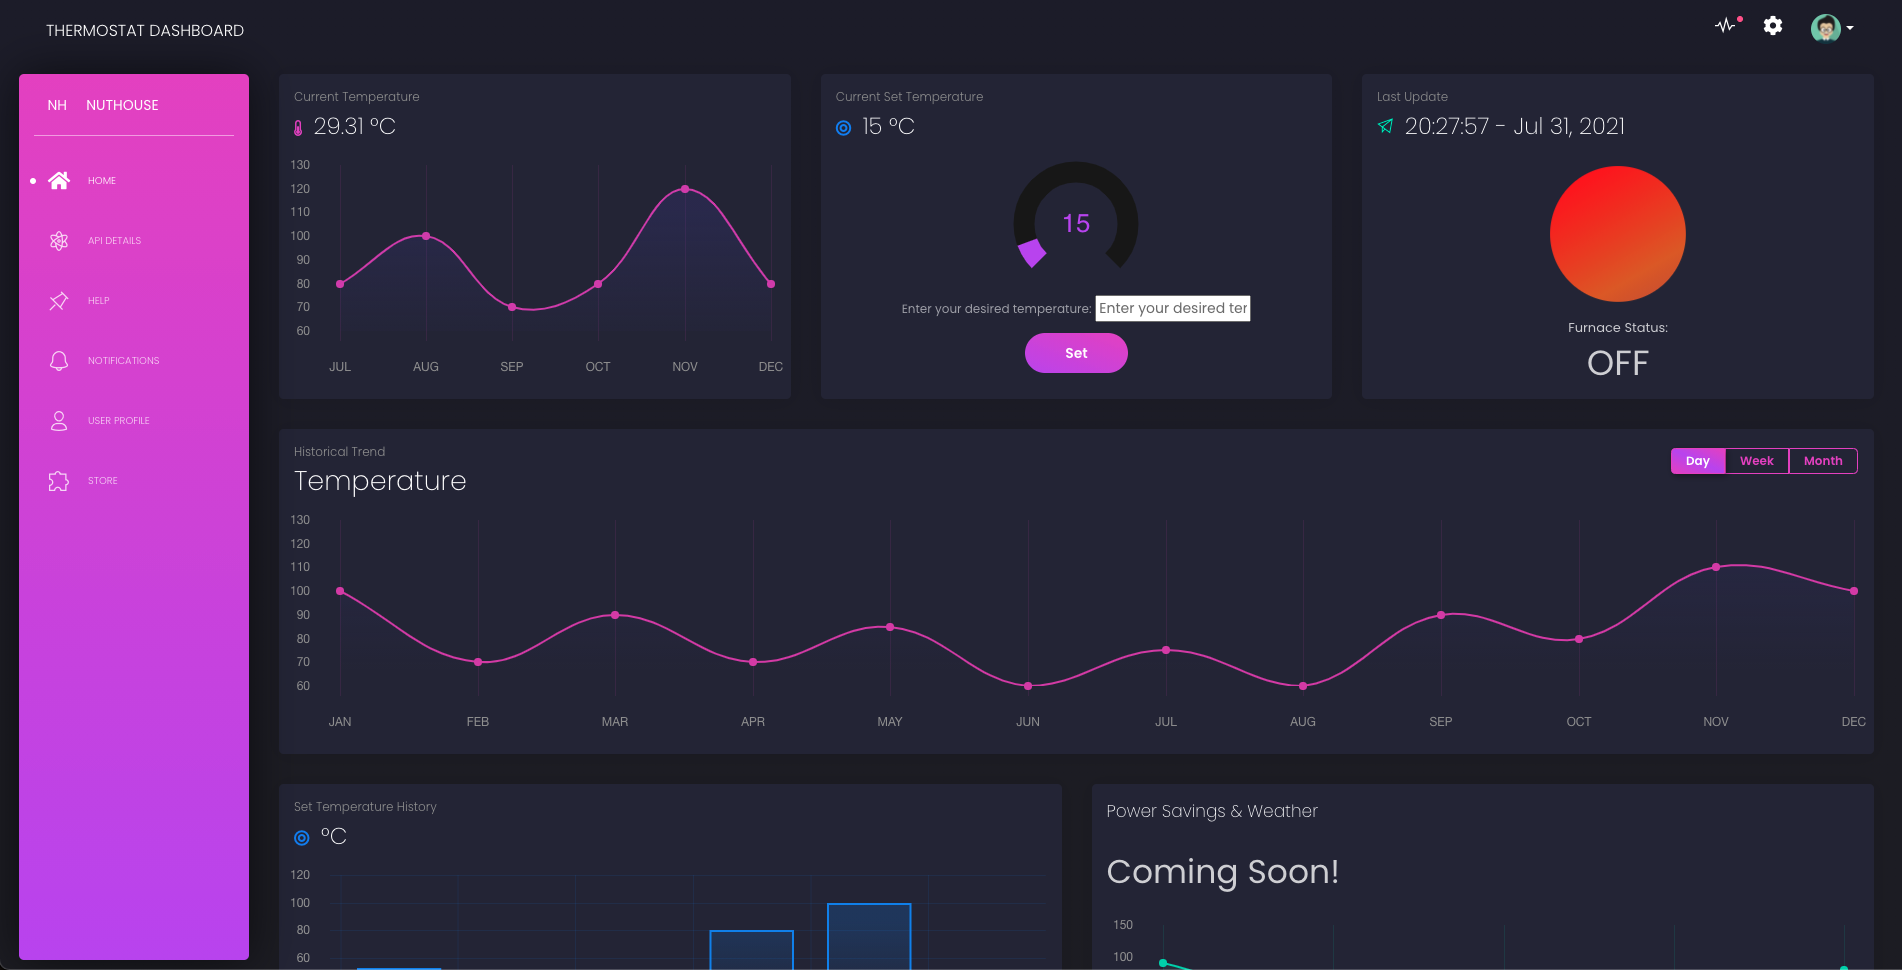
I have been working hard to display the site with a proper dashboard feel rather than bare bones HTML. I also adding routing so the
domain smarttherm.dylanrae.ca
routes to the webserver running on the raspberry pi. I had some problems with the https certificates and will get that working later.
The graphs are currently using sample data but getting them working with real data is one of my next goals. For setting the temperature
I added a dial graphic and for the furnace status I did a simple css animation to make a circle pulse to give the user a simple visual
indication of its status. After getting the graphs working, I will start on other features such as user logins, set temperature schedules,
and attempting to optimize the energy use of the furnace.
A lot of coding and recoding has been done on the backend for the web app. There is the start of an API which is used by the website
and will also be used for future mobile application development. I am trying my best to follow an API-first design philosophy. I use
Javascript with jQuery and AJAX to send GET requests to my database to retrieve thermostat data. These GET's are sent at regular
intervals to display live data for the user. There is also a form for setting a new temperature that writes the new temperature into
the database. There is no styling applied yet, but I have the static folder setup for when it is type to do some css.
I am starting to get a better feel for Flask and feel like I am making progress quicker now. I wanted to integrate my separate python
script used for managing MQTT communication with the Flask app because Flask has a builtin MQTT plugin. Unfortunately, the Flask plugins
are not as reliable as I would hope. I was able to get it integrated and working properly in a testing environment, but as soon as I
deploy to production on Apache, the MQTT functionality stops. I found others online who are facing the same problem and there is no known
solution. I also had some problems setting MQTT configuration parameters in the CONFIG file, which also turns out to be a known issue.
Flask also has a builtin plugin for MySQL, however using this plugin with MQTT brought about some other problems that others online had
and were not able to resolve so I reverted back to using the standard mysql.connector. I now need to decide if I want to go back to having
MQTT management separate or continue to troubleshoot so it works on a production server.
I have been busy with work and completing my spring semester at school so progress has slowed. I started the develop the back-end for
the thermostat that will act as an API as well as manage html files for the website. I am currently using Flask to do this, however
may look at other frameworks in the future. I was able to get some test sites working with Flask and am now working on integrating
my Flask code with Apache. I am having some problems with the .wsgi config file, but a short amount of time troubleshooting should
be sufficient to get them working. After this it is time to start adding some serious functionality!
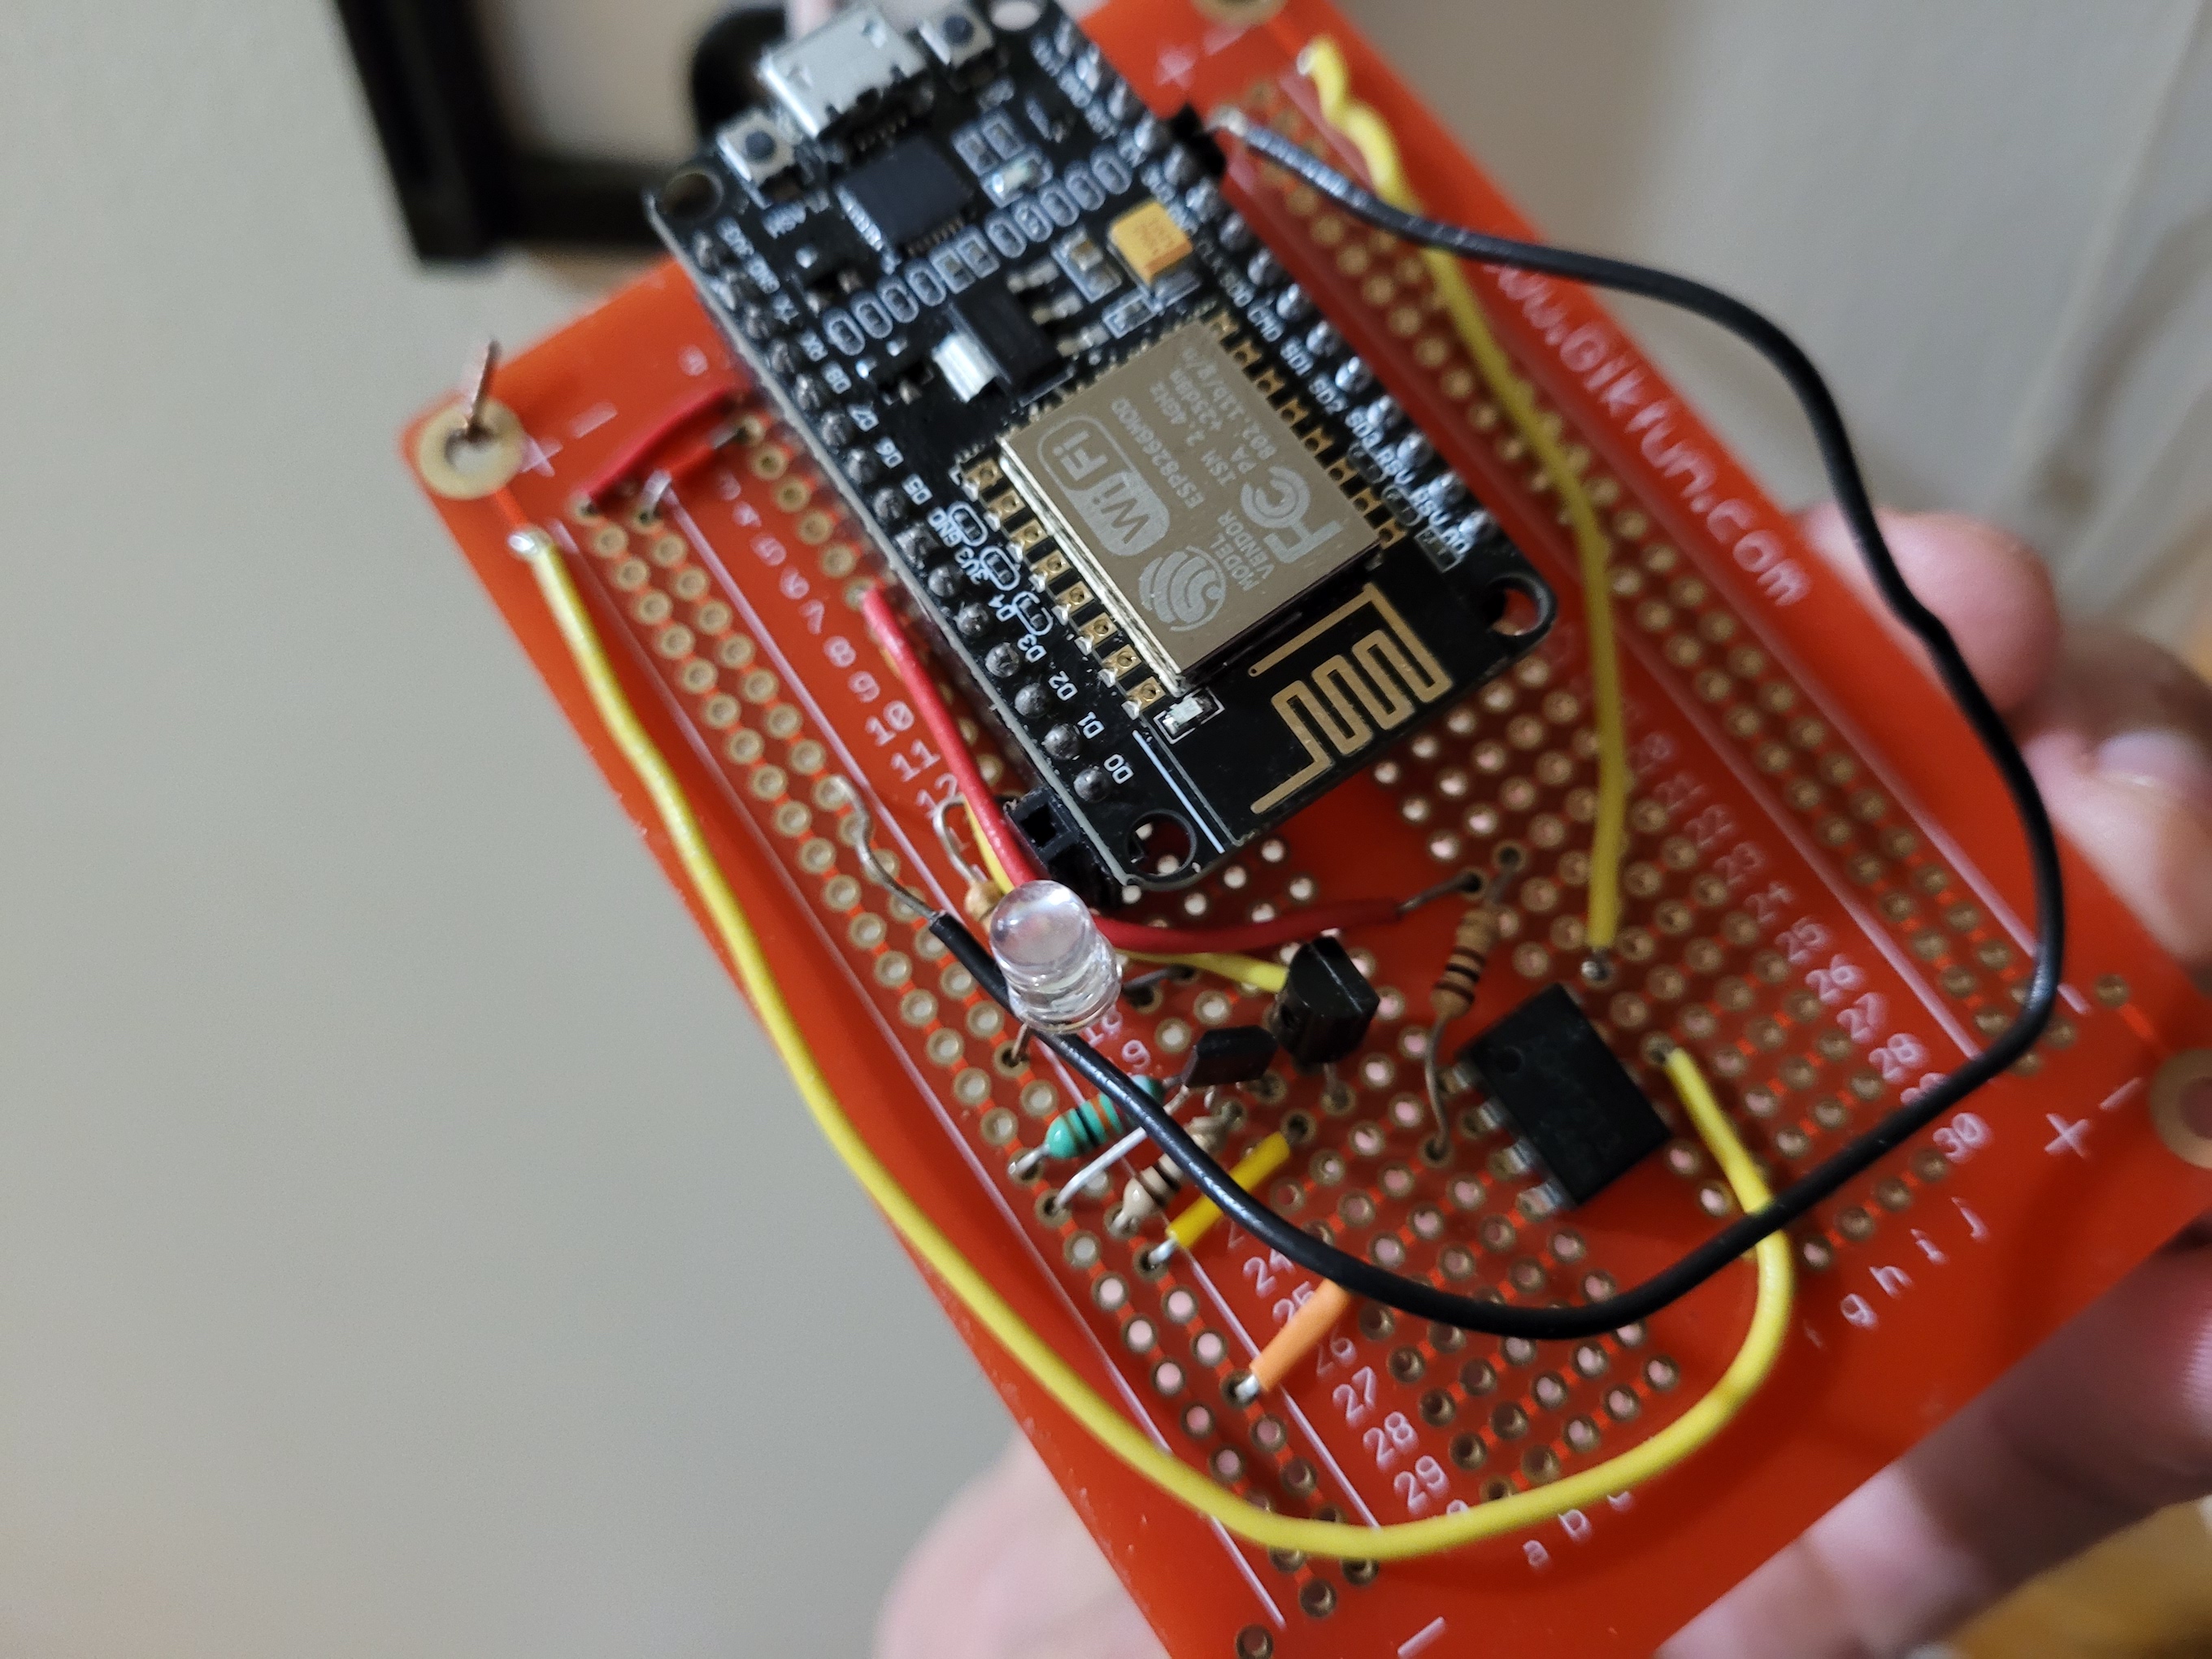
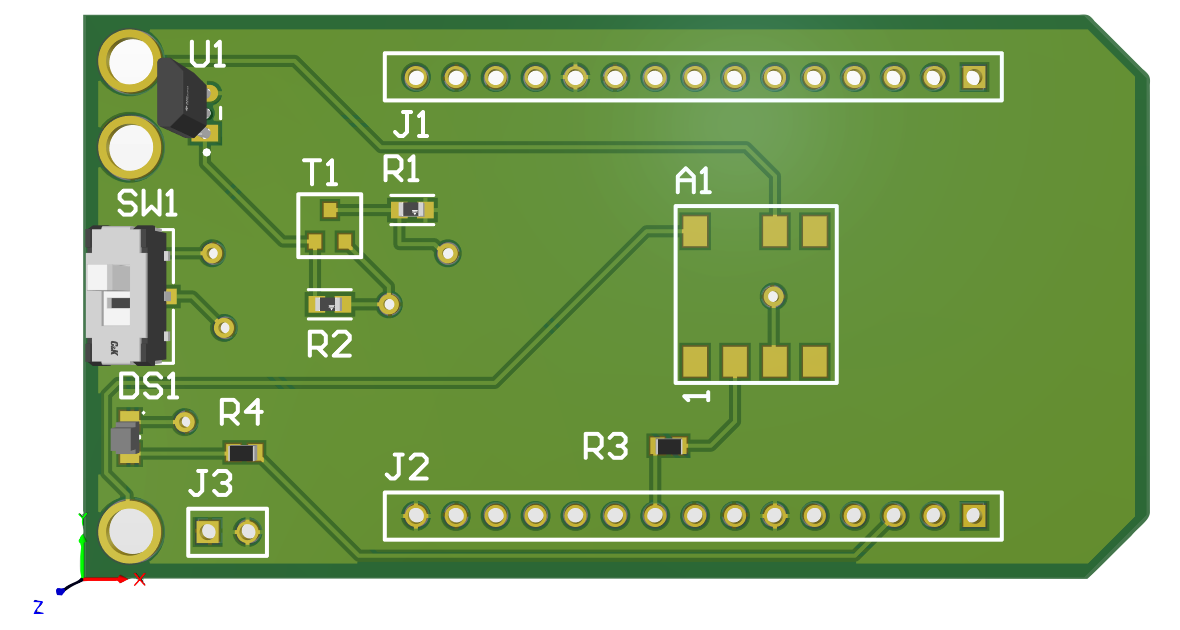
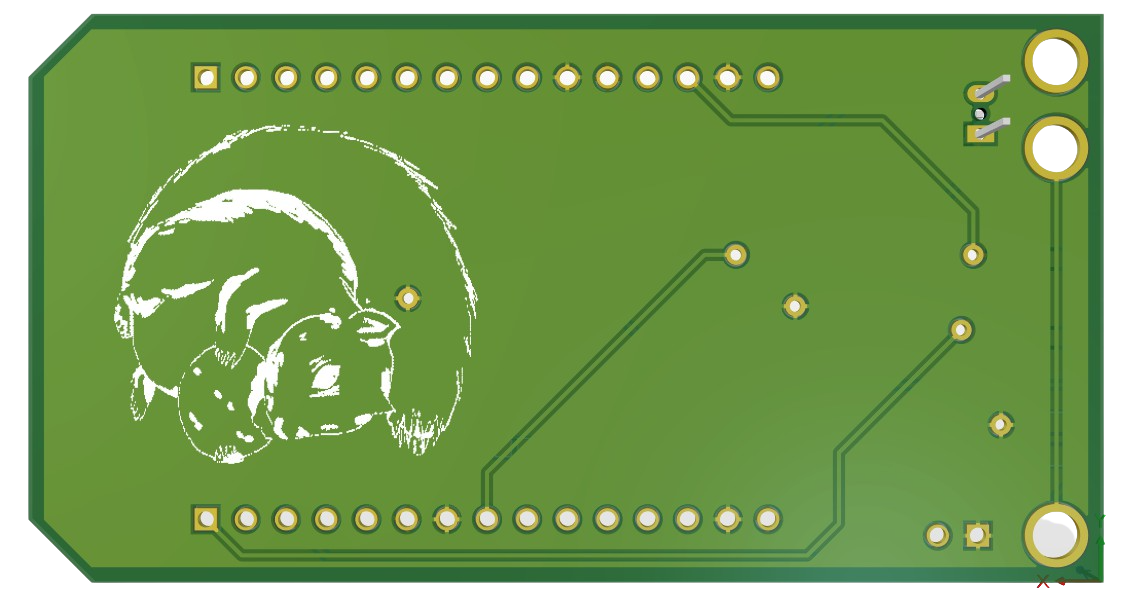
I have ordered the project's first PCB, check out the render's below (not all components shown). This PCB will greatly improve the reliability and form factor. Thanks to Aidan Johnson for his help to design it.
In addition to the PCB, I have been working to design a circuit that can recharge a battery back by using the furnace's control signal as a power
source. Currently, I am planning to use a LiFePO4
battery, however I am facing some difficulties. While this style has an ideal operating
voltage and discharge curve, There are no commonly available chargers for single cell versions of these batteries. There are charge management
IC chips, however these are offered as surface mount only. Before designing a PCB to use/test these IC's, I usually test components I have not used before
on a breadboard to ensure they work as I expect. The charging module as a whole will need to convert the control wires' 30VAC to ~4.5VDC for charging the
battery pack. Additionally, the module will have to ensure it does not draw to much current on the control signal or the furnace will interpret it as a ON
signal.
This PCB will greatly improve reliability and the form factor. I am in the process of designing a new slim profile enclosure for the new hardware. Future efforts
on hardware design will also include a custom design to support and program the ESP8266 microprocessor that will be custom built instead of using the general purpose NodeMCU.
I have installed a LAMP server on the Pi that will act as the back-end for the thermostat. Apache is used to serve requests over HTTP/S. A MySQL
database was installed and is currently being used to log data from the thermostat and will be used as the backend database moving forward. PHPMyAdmin
was also installed and I played around with some of the features of this tool. Next I would like to build some sort of API that can be used by smart home
devices (Google Home/Amazon Alexa), mobile apps (iOS/Android), and websites to view the temperature data, set schedules, and set new temperatures.
I also wrote a Python program that interfaces with the MQTT broker. The script receives the data packet "currentTemp/setTemp/heating/battery" every
30 secs from the thermostat and writes it into a MySQL database for processing to be handeled by different back-end program.,
and controls the thermostat by sending ON or OFF signals. Incase the connection breaks(communication error), the
ESP also has the capability to control the thermostat to meet the set temperature onboard.
Finally I started to play around with the Flask framework in Python for building a website for the thermostat. The stack for this project is already
bigger than I thought it would get and there is still lots to do!
I finally finished a new version of firmware to run the ESP8266 microcontroller. Here are some of the features I use to improve power efficiency:
- Not using a DHCP connection and using a static IP instead. This allows the ESP8266 to connect to WiFi quicker.
- Stopping the default functionality of writing connection details to flash memory. This saves 1.2 seconds.
- Storing the channel number (BSSID) so the ESP8266 does not need to scan for a network. This is done by saving the data in a struct and saving the data into RTC memory. Then on connection it checks if the data is correct and attempts to connect. If after 100 tries with no connection it will not use the stored BSSID data and scan. If after 600 tries the chip will go back into deep sleep.
- Only turning WiFi radio when I need to. This is just long enough to transmit current temperature data and listen for any incoming messages.
- When waking from deep sleep, I bypassed the default setting and keep the WiFi radio shut down until I need it to be on.
Unfortunately I did not benchmark the power use before the update to verify my new design, however moving forward power usage and battery
life will be tracked for future improvements.
I have decided to keep track of my progress here in this section. Enjoy my first entry: Today I set up a Raspberry Pi to act as the MQTT broker for the thermostat. First, I used ssh to connect to the Pi and give it a static IP so that my routers DHCP does not change it. This ensures all devices on the MQTT network always find the broker. Then I downloaded a MQTT broker onto the Pi and configured it to start up automatically on boot. After some testing with a MQTT client and the thermostat I verified it was working correctly. Next steps are to set up a SQL server on the Pi to log data and to set up a python flask powered webserver for displaying the data.
Design Requirements
Air temperature accuracy of ±0.5℃ within set temperature.
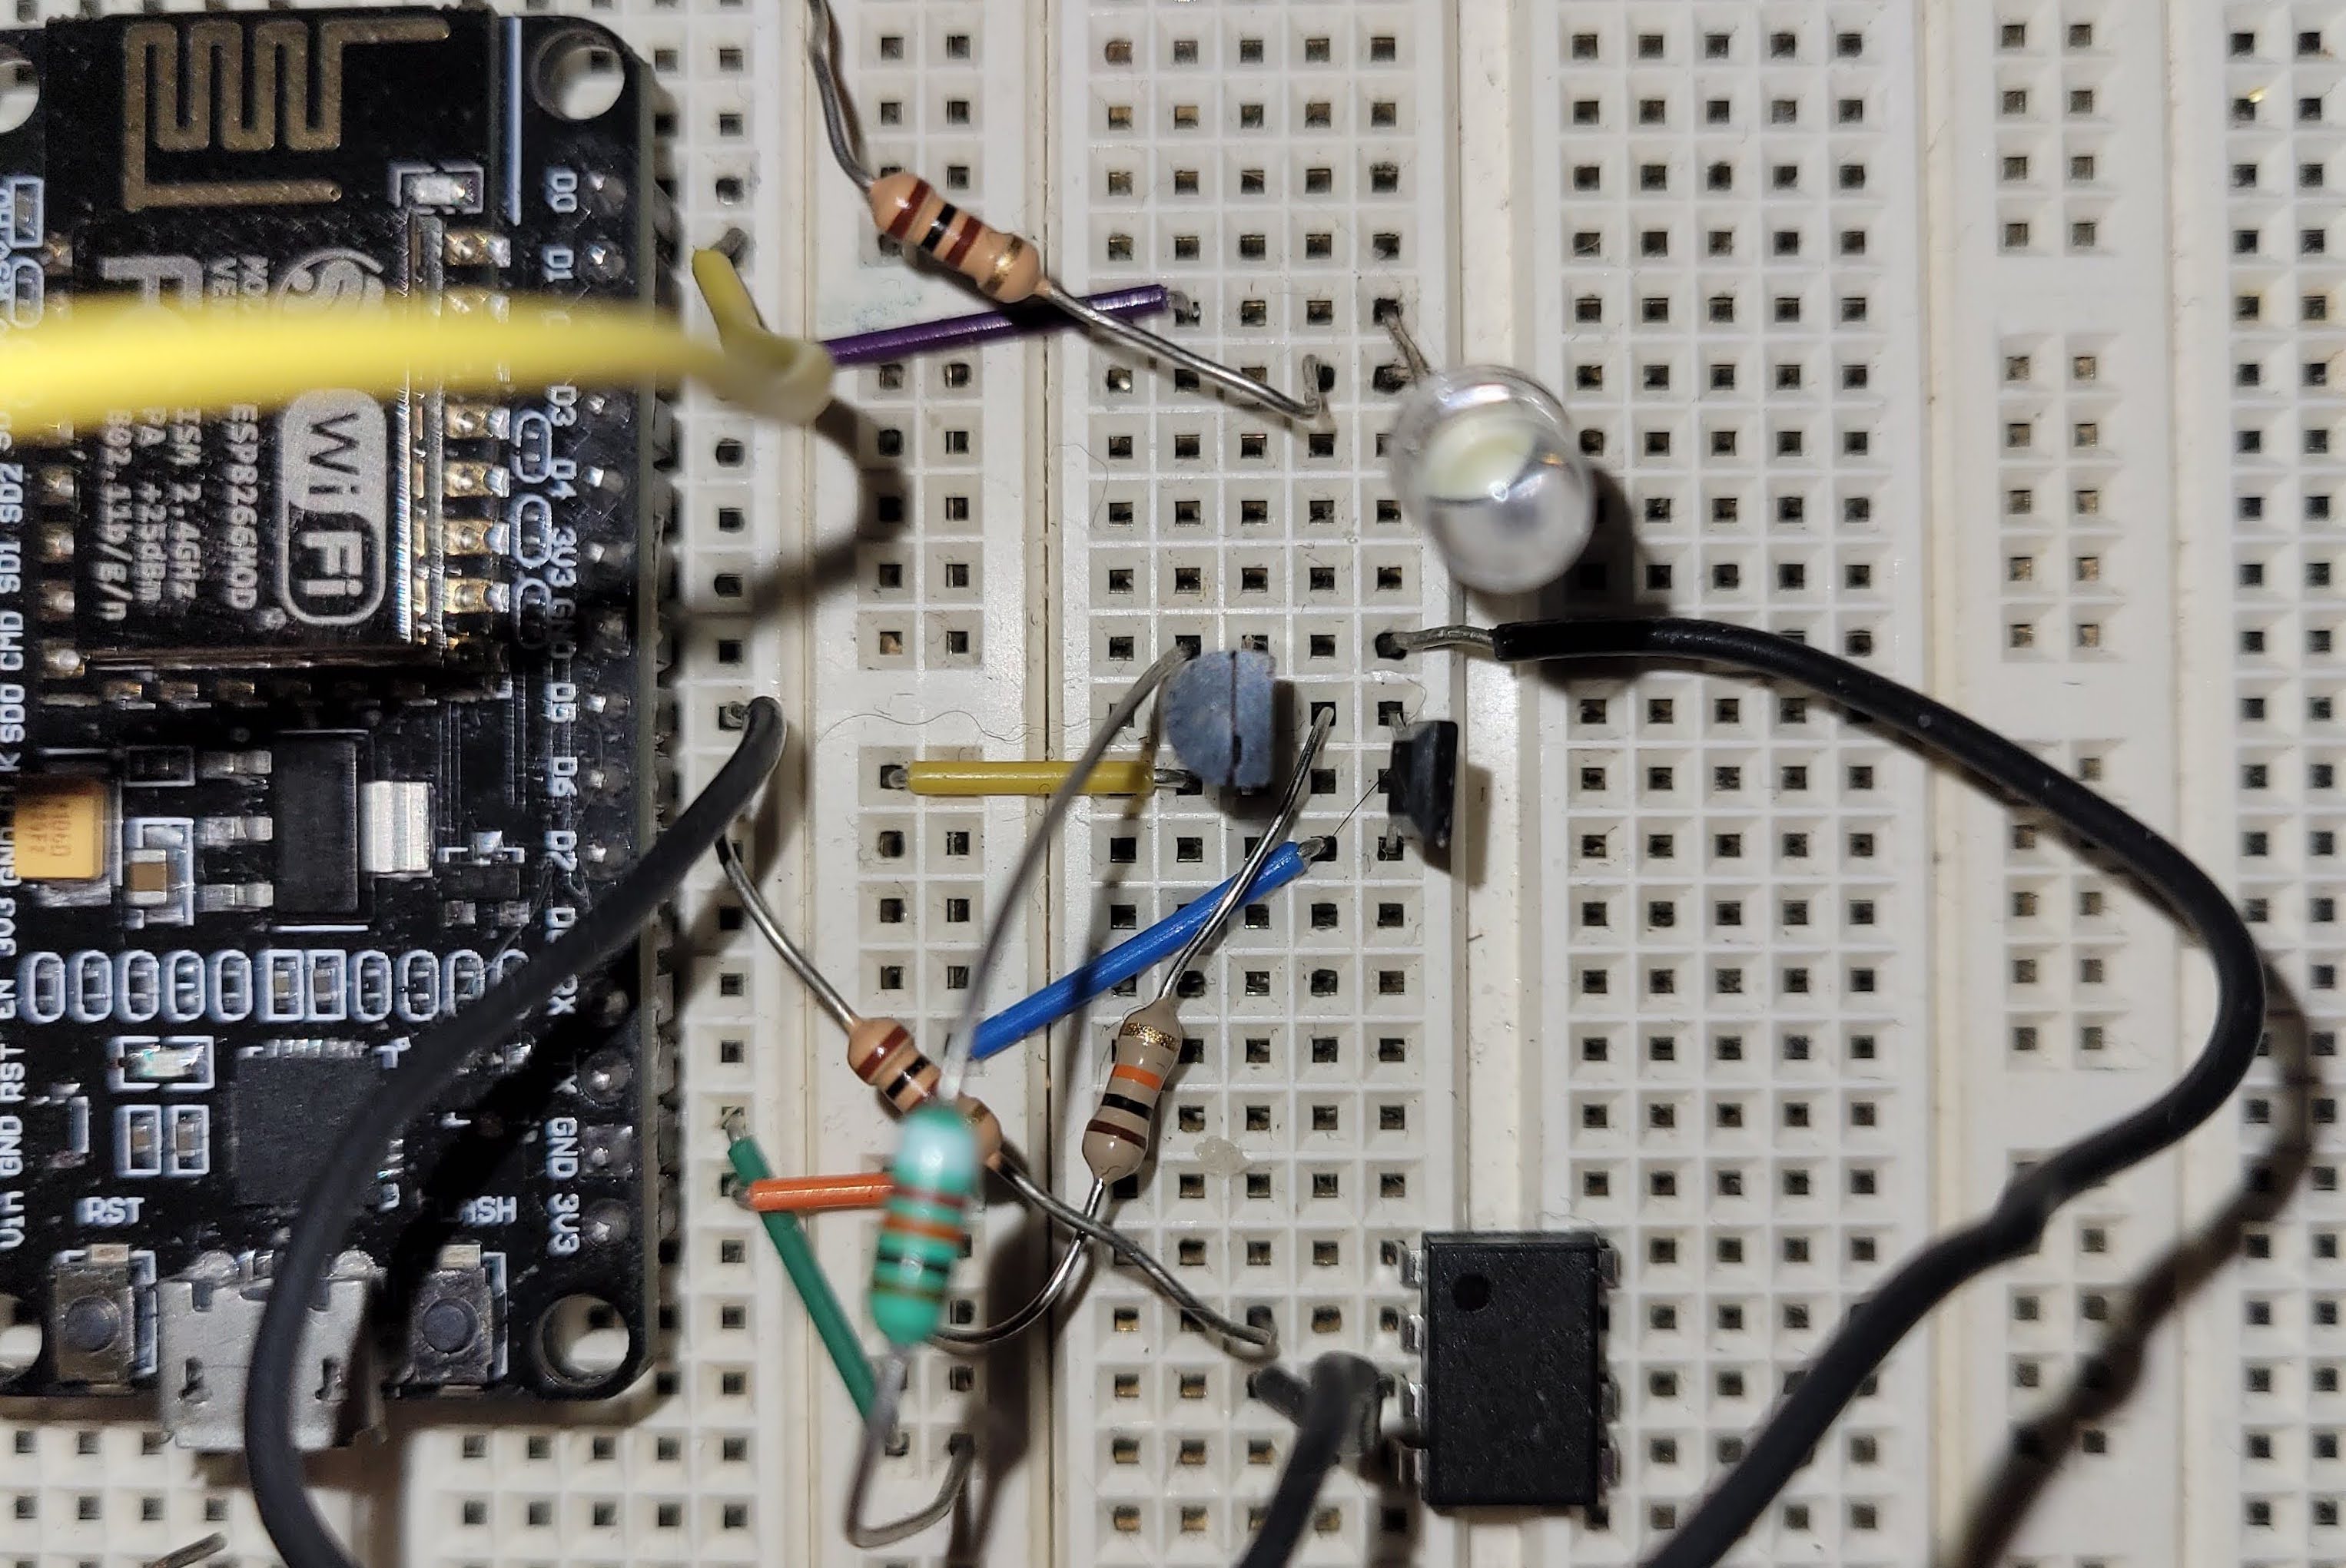
The first iteration used a simple analog temperature sensor that worked by outputting a voltage proportional to the temperature reading. While the analog temperature
sensor was easy to implement for a first attempt, it was not ideal for a number of reasons. Firstly, the accuracy of an analog sensor could not be
guaranteed without a calibration procedure. A digital sensor would not require this additional calibration process. Secondly, the board the ESP8266
is mounted on only has one pin capable of an analog reading. I wanted to keep this pin free for future features such as being able to read the battery
level remaining in the battery pack. Finally, the resolution of readings from an analog sensor is limited by the 10-bit ADC onboard the NodeMCU. While
the resolution is high enough for the intended application, I preferred to not have my design limited this way.
The digital sensor I choose is the LMT01 by Texas Instruments. The LMT01 was selected due to its low cost, 2-pin through-hole or SMD packaging, and
because it met the electrical specifications needed to work with the rest of the system. The LMT01 communicates with a pulse-count interface. I use a
3904 BJT to pull the pulse's up to 3.3V or down to near 0V for a cleaner signal for the ESP8266 to read.
Ability to interface with thermostat using a personal computer.
This is a key requirement of the design, as I wanted to have the
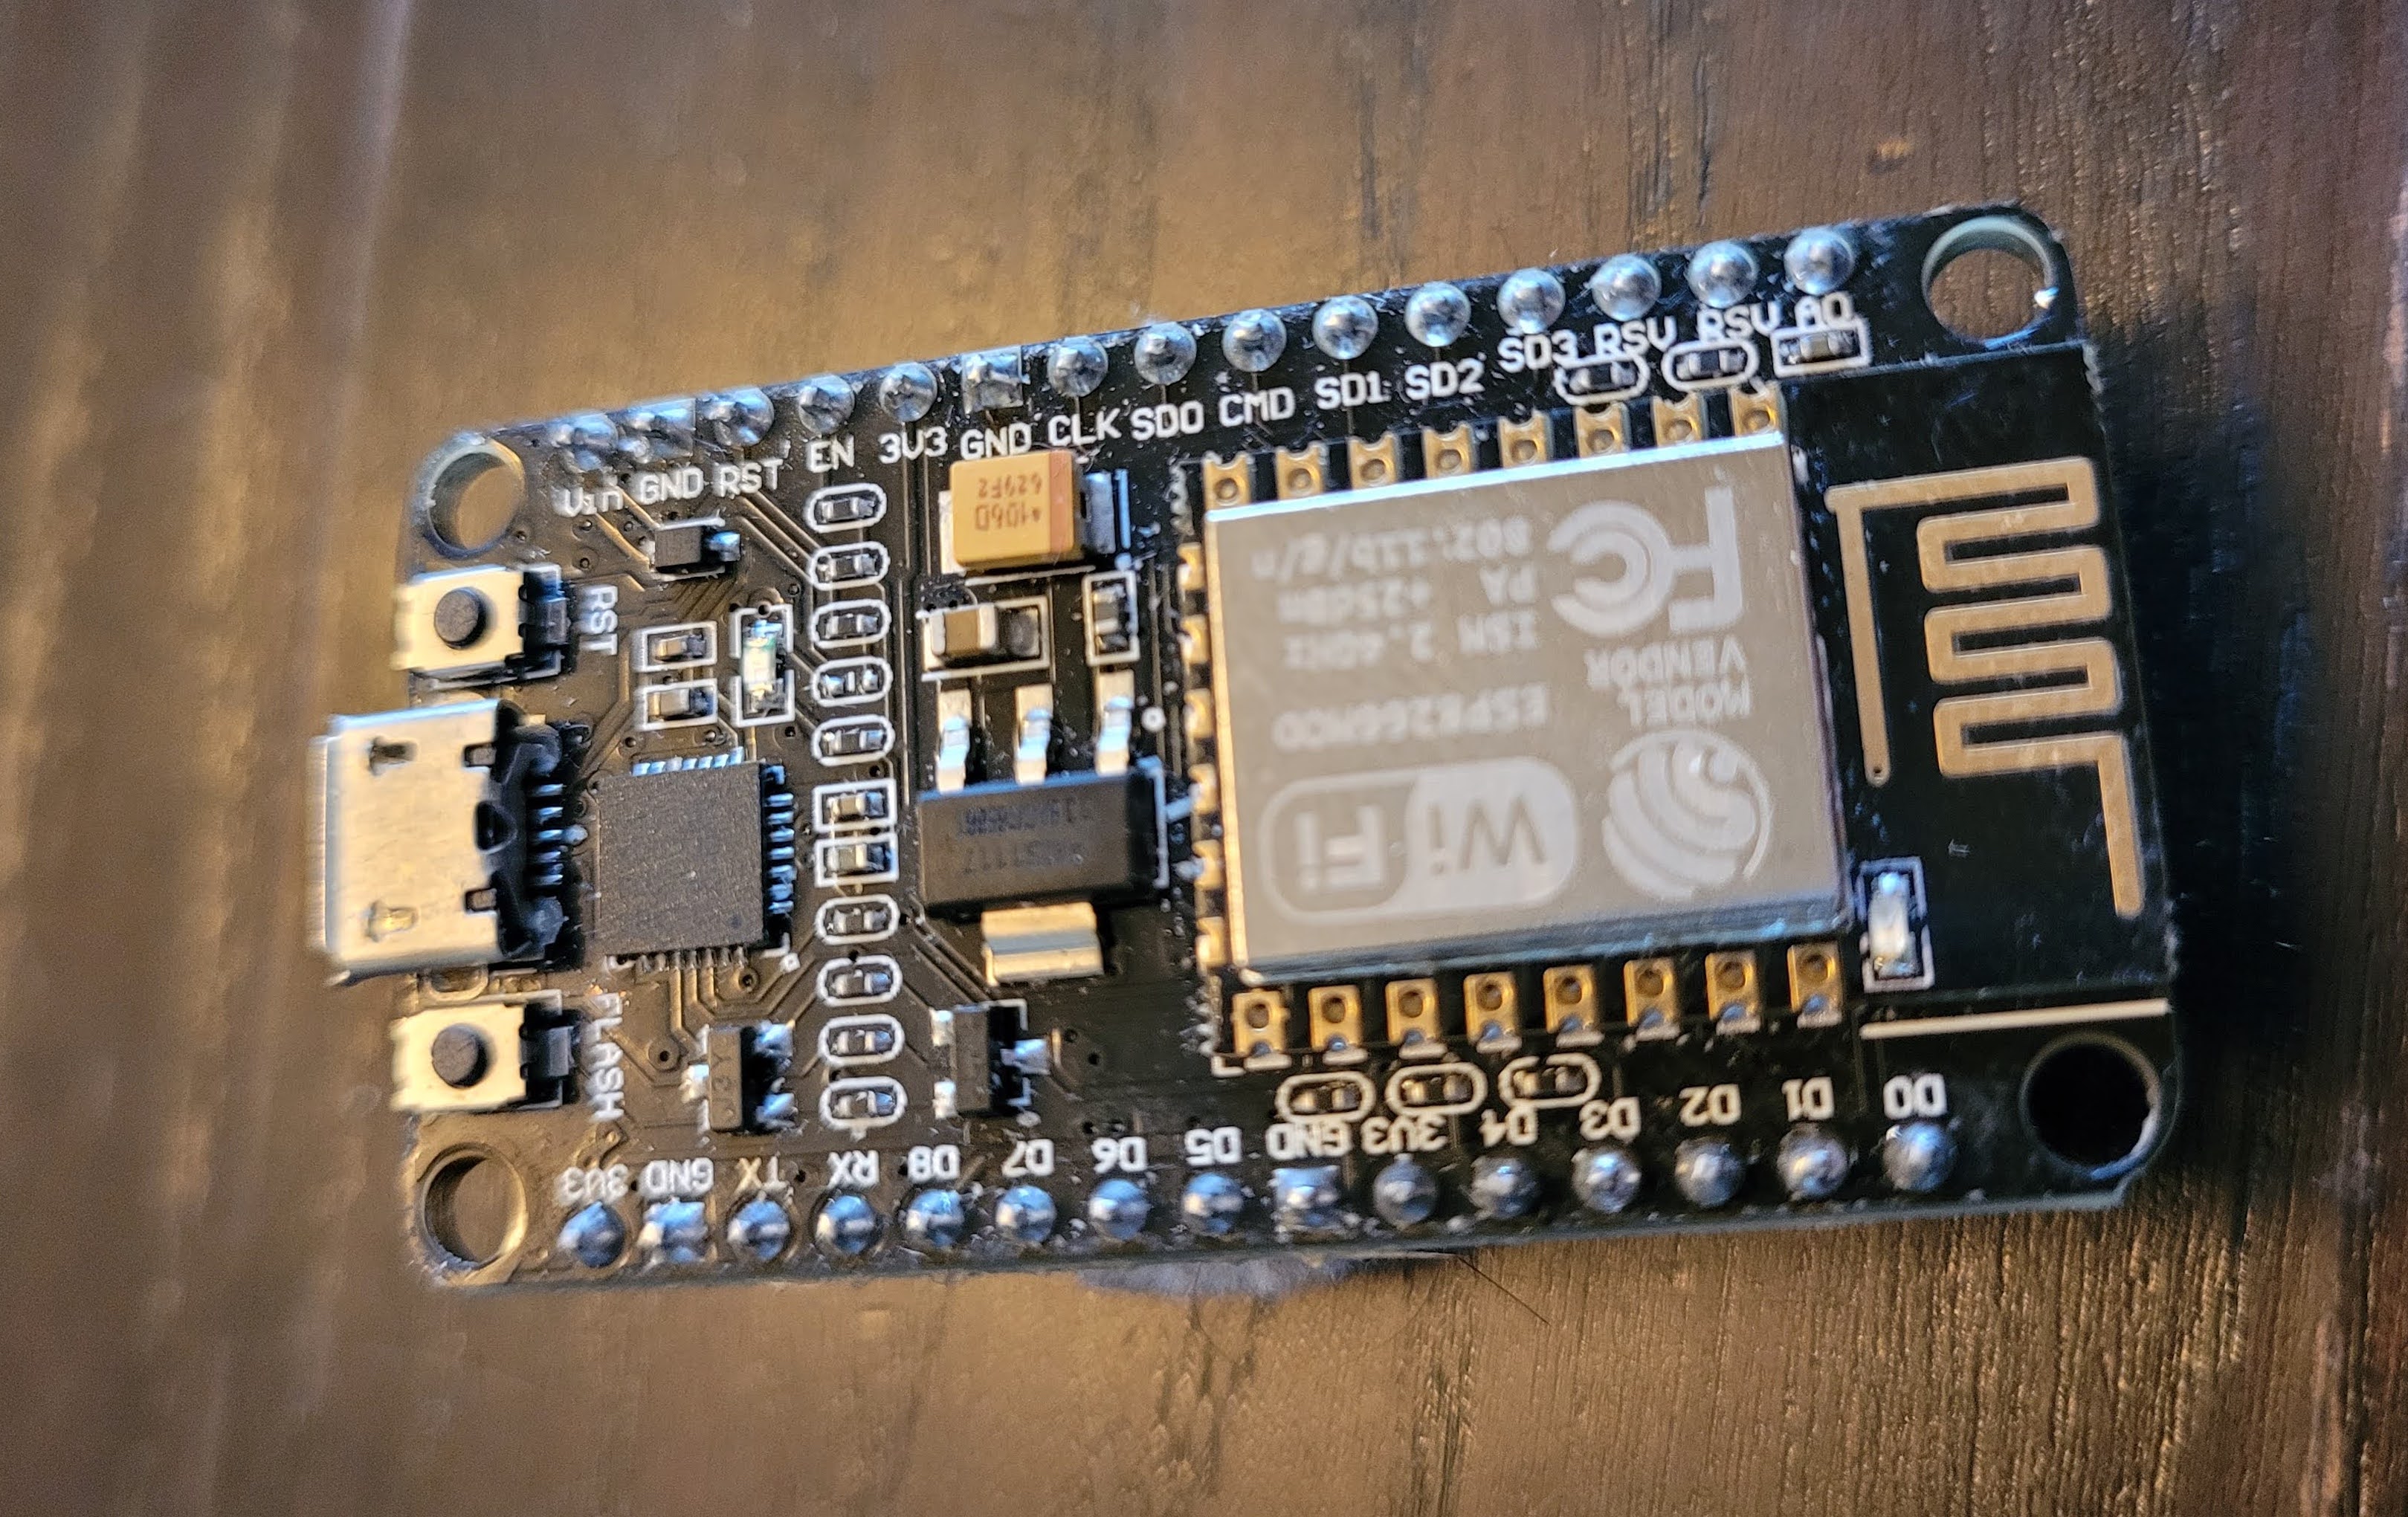
convenience of controlling the thermostat from all of my devices. Central to implementing this functionality, was the selection of the ESP8266
microprocessor used in the design. The ESP8266 has an integrated 2.4GHz Wi-Fi radio with a built in antenna. This device was chosen for it's low cost,
wide availability of software development kit's (SDK) with extensive documentation, and power-saving capabilities. Currently the ESP8266 is mounted on a
NodeMCU development board, and future development will have a purpose built PCB for reducing costs and improved power savings. Additionally, work will
be done to look into migrating to the next gen ESP32 chips.
To communicate with the ESP8266 the MQTT protocol is used. The MQTT is a standard messaging protocol for the Internet of Things (IoT) originally developed
in the upstream oil and gas industry. This protocol is well suited for my design because it is extremely lightweight, scales well, and has numerous features
that will be valuable for future development. I am experimenting using a public MQTT broker, as well as my own running on a personal computer. Messages are currently
sent with QoS 0 through well organized topics.
Eventually, I hope to have a back-end system that will control the MQTT broker. This system would be responsible for storing historical temperature and user data in an SQL database
as well as performing analytics to help users reduce their energy use for heating their homes.
Ability to override heating control wirelessly and physically.
This functionality is important for testing and fail safe purposes. Physical override is implemented with a simple slide switch that closes the furnace control circuit. Wireless override is implemented with a MQTT channel that can be toggled to take precedence over all other processes (such as the scheduled and user set temperature) to force the furnace into ON or OFF operation. When designing the device, I wanted to ensure the proper fail safe's were in place in the event of a hardware, software, or power supply failure.
Be able to switch a furnace having a control signal of up to 600mA and 30VAC.
A two-wire
furnace system is controlled by opening or closing a control signal. When the furnace's control
signal is closed the furnace detects flow of current and begins heating. By opening the control circuit
the furnace ceases heating. The microprocessor needed to be able to open and close this control circuit. This
functionality was implemented using a solid state relay (SSR).
A SSR was chosen for the job for its reliability and fast switching speed. The control current for the SSR sources from the
microprocessor and is set with a resistor. The model I choose is designed to use a DC control signal to switch an AC circuit.
Do not require an external power source.
This feature will be implemented by leaching current
off of the furnace's control wire. To complete this requirement the AC control signal will need to be converted to regulated 3.3V
DC for the microprocessor. The first iteration will only leach current when the furnace is set to ON. This way, current will already
be flowing through the furnace control wire and leaching current will have no affect on the operation of the furnace. However, when
the furnace is not on, an external power source such as a battery will be required (which will require periodic charging).
The second iteration will not require the user to have to periodically charge the battery. Instead, the battery pack will be
slowly recharged by leaching a small amount of current off the control signal as required. Testing will be required to determine the
maximum about of current that can be leached for charging without indirectly turning on the furnace. This method to complete this requirement
assumes this maximum current value is non zero.
Have a battery life of 30 days.
The ESP8266 microprocessor draws a maximum of 170mA but typically uses 70mA during normal operation. Additionally, the microprocessor has functionality to implement a variety of sleep modes to reduce power consumption. I utilize the "deep-sleep" functionality which reduces current draw to a reported 20µA. The deep-sleep functionality works by stopping all non-essential processes and simply operating a timer (set by the user). Once the timer expires, the D0 pin is set to high. By connecting to D0 pin to the RST pin, the device can be woken into a normal operating mode. Eventually, the user interface for the thermostat will have the functionality for the user to be able to set the sleep time to give users more control over the device. Since the majority of the power is drawn by the Wi-Fi radio, future software versions will be optimized to reduce Wi-Fi use.
Ability to interface with thermostat using a device with iOS/Android.
Coming Soon!
Ability to interface with thermostat using Google Home and Alexa.
Coming Soon!